Showing posts with label Sewing. Show all posts

Saturday, 15 November 2014

Lovely little hand warmers

These little hand warmers take seconds to make and can use up any old scraps of material and old rice! useful for keeping your hands warm on a cold morning or cool you down in the summer!

All you need is,

- material
- rice
- needle and thread
- pins


So first of all you will need a template, you can chose whichever shape you want, I decided to go for a heart but squares work well too. To make my template i simply opened up word, created a shape and printed it off! 

You then need to cut two shapes out of any material you wish. You may want to use wadding alongside the outer material to hold in more heat.

Next pin around the outer edge and sew the right sides together, leaving a 1/4" seam allowance and a gap so that you can turn the hand warmer inside out and fill.


After you turn your hand warmer inside out you will need to fill it with rice.

You can use whatever rice you want, lentils also work as a substitute! Use a teaspoon to half fill your hand warmer, this gives it a bit more flexibility in your hands.


You will need to sew up the hole by hand to ensure that you don't get any rice spillages.

Then you are ready to heat up your hand warmer, simply place it on a plate and put it in the microwave for 10-20 seconds, no longer.

Your hand warmer should stay hot for about 5 minutes, you can also use it as an ice pack just place it in the freezer for about 5-10 minutes.


Any questions and queries email me at  butterflyfairycrafts@gmail.com

Sunday, 22 June 2014

Mug rug

Hi today's post is a sewing post, this is a quick and easy project which was made in user 15 minutes!

Materials                  

- plain cotton fabric x 2 ( 8in x 8in)
- wadding ( approx 8in x 8in)
- Cotton thread

I used a embroidery machine but you could also sew on any letters or words by hand!


 So this is how to make a mug rug!

Place 1 piece of your plain fabric onto of the wadding, secure with an embroidery hoop. Then select a design or word/letter you want to be embroidered onto your mug rug, (if you're doing this by hand ignore this step!) I used a two tonal thread to create the stripy effect.


 Embroider the design onto the fabric, make sure the fabric is tight in the hoop.

Next you need to sew on the back piece of fabric, to make it suitable for washing you need to secure the back fabric around the edges and in the middle, so I put a neat box around the embroidery.


 Now you have your very own mug rug, try adding some ribbon around the edges for a final splash of colour!


Saturday, 24 May 2014

multi purpose fabric stand

Make this multi purpose fabric stand in under 30 minutes!

This can be used for tablets, books, e-readers and also phones.

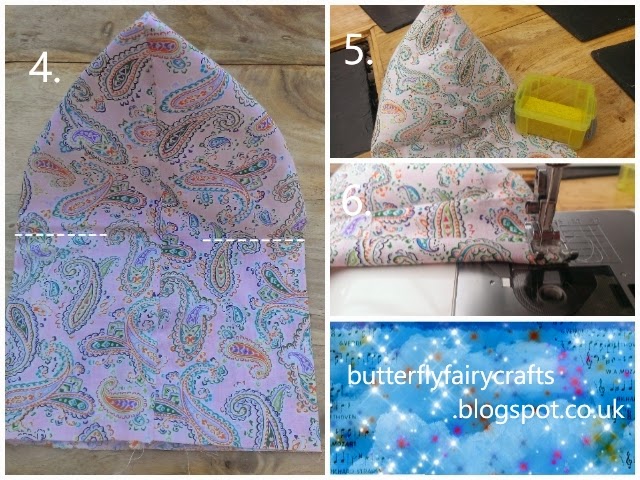
Note: the numbered steps match to the numbered pictures.

What you will need:

+ 2 A4 size pieces of material
+ some polyester stuffing
+ decorative sand or gravel
+ some thread
+ a sewing machine or needle
+ two chop sticks


The first thing you will need to do is set up you're sewing machine, and prepare everything else so it is easy to get when you need it!


 1. Cut out your material, you will need 2 A4 sized pieces of material. If you want a smaller stand adjust the sizes accordingly, but this stand is suitable for multiple items.

2. Sew along the two longer sides and one of the smaller sides( leaving one of the shorter sides open )

3. Turn sideways and open to form a pyramid.


 4. Measure 3 inches in from the open edge and sew 1 1/2 inches in from each side. This is represented as dotted lines on the picture above.

5. Stuff with polyester filling then add some decorative sand or gravel. This acts as a weight and is available from hobby craft and most florists.

6. Sew up the hole, then starting from the open edge place the two chopsticks and roll until it is only 1 inch away from the sewn up hole. Sew along the edges and middle to secure.


Enjoy using your multi purpose fabric stand!!!!


This post won't be here forever, subscribe or print , so you can keep this post and its contents for when you need to use it.


Monday, 14 April 2014

Weekly challenge#1

HI, this weeks challenge is...

What can you do with a pair of socks?

I did a bit of up cycling and added a lace trim around the tops of the socks.------->

See what you can do and don't forget to keep checking back to this blog as lots of other projects will be appearing soon!

From)


Friday, 11 April 2014

Easter chicken/doorstopper

Hi, I wanted to create a sewing post and as I recently made this adorable chicken in under 1 hour, below are the instructions on how you can make a great easter chicken too, enjoy sewing!!!


You will need

2 x 6in squares of fabric ( you can make this chicken as big or small as you like but this is the size i recommend! )
Similar templates and felt to the ones in the image below
2 buttons
pins
needle
matching thread


Using the image above as a guide cut out a tail, waffle, wing, cone for head and beak pieces.

Pin these to felt, I used red, yellow and pink.

Place the wings onto the outer fabric squares and sew around the curved edge using a straight or zig zag stitch. Leave the flat edge so that the wings will serve as pockets.

Take one piece of the material which you have sewn on one of the wings and leaving a quarter inch gap from the edge sew on the tail and cone for the head at the top of the fabric.

Then sew on the beak pieces, beak A goes nearest to the top and beak B just under beak A.

Finally sew on the waffle underneath beak B.

Put the two pieces of material right sides together and sew along the top and two sides leaving the bottom open.

Pull together the two seams to form a pyramid like shape. Sew around 2 inches in from each side, leaving a hill to stuff your chicken with.

Turn your chicken inside out and stuff, it can be made into a doorstopper if you add some fish-tank gravel available from a pet shop.

Sew up the hole and sew on the eyes.

Your easter chicken is complete!