Showing posts with label jewellery. Show all posts

Monday, 15 September 2014

one delayed ( but fun ) project

So now about the delay, I wrote this post but forgot to publish it ( silly me ) haha! But its here now, published and ready for you to read!

This is really simple and is just really a filler until I have a chance to post my nativity scene!

Its a lollipop! unfortunately I don't have an image of the finished product but you can kind of see how it turns out!


This is what you will need, I am using cloud clay but you can used whichever clay you want if you are using fimo or sculpey you don't need to colour the clay yourself!

 split the clay

 
dab with a sharpie to add colour then roll until the colour is well mixed


roll the white and brown to make the stick


And roll up the red to make the lollipop


And there you have it one simple clay project, you can make it into a pendant or whatever you want!


Monday, 18 August 2014

Easy flower hair clip


This clip is super easy and can be made using the Blossom sugar art moulds and a few sharpies!

So what you will need is:

A clip
Some white clay
Some sharpies or other permanent markers
A mould I used the Blossom sugar art Hydrangea
Some glue

And thats it!


So after you've gathered all of your equipment your ready to start!

1. Take your clay and using the cutter provided in the mould set cut out the flower shape, I used Fimo because of the strong texture, in some of my posts you will see I use cloud clay however it is too stretchy for this and you really need clay that will hold its shape!

2. Place it on the mould, make sure you align the cut out correctly in the mould.

3. PRESS!

4. Now open it up and carefully peel out the flower.

5. Bake or leave to dry, then get creative and decorate with some markers, you could try a funky pattern or just colour it in a block colour!

Finally add a clip using glue then add a coat of gloss to seal in the colour and make it shiny!


Be sure to visit on Wednesday for a sewing project. And keep up to date with projects and post and sign up for the mailing list!

Thursday, 31 July 2014

Retro rose

Hi again now as this post is a two step process I didn't post yesterday as I was working on this for you!

So lets begin first of all you will need to make a mould, I brought some silicone putty from eBay which enables you to make your own moulds!

1. Here is an image of the putty, as you can see it has two parts, part A and Part B.

2. Take a small amount of Part A, don't worry because a little goes a long way!

3. Now take an equal amount of part B.


4. Mix them together, if you are in a hot room or your hands are hot the putty will start to 'melt', but don't worry because this doesn't affect your mould!

5. You will need to wait until it turns a lighter purple and then press it gently over the object you wish to mould, I used a plastic roses which I purchased for £1 along with some other things! Leave it for 5 minutes then remove the object, leave the mould overnight to completely set!

Now we are going to make the retro rose!


1. You will need:

orange clay
pale brown clay
white clay
green clay
brown clay
and a rolling pin

2. Roll out your white clay, then roughly cut into a rectangle.

3. Do the same with your other colours then lay them onto of each other.

4. Cut from one corner to the other, then match up the two shortest edges.

5. Roll in the palm of your hand so that the colours swirl but you still have the stripy pattern, then press into your mould.

6. Carefully remove from the mould and poke out a small hole in the top of your rose to make it into a pendant, if you aren't making it into a pendant you can bake the clay in the mould.

Now you have a stylish retro rose!


Monday, 28 July 2014

Hello, again

Hi, I'm finally back WITH a project for you to try! I f you have been reading some of my older posts you will know that today is the start of the project a day campaign! If you'd like to get involved view the campaign page.

Now on with the project!


This is an easy and very basic project but gives you a great way to store your bracelets without just throwing them in your draw!

What you will need

toilet roll tube
card or paper
glue, I use a glue tape pen for simplicity

These are all illustrated below, as well as the finished product!


Now as I said this project is super simple and so only requires three steps! Yes, three steps!

So here we go

Step 1  Measure the length of your toilet roll tube, mine was 10.5cm.

Step 2  Cut the card to the same width as the length of your toilet roll tube. ( cut it so that it is wide enough to cover your tube ) Don't worry about the length of the card/paper.


Step 3  Add some glue to the card/paper and stick it onto the tube, smooth it down as you wrap the card/paper around the tube, if there is any excess card/paper overlap it. As you can see from the images above I overlapped mine slightly on the edge, this ensured that the tube edge was well hidden!

Another variation

You could stick a circle onto the base of the decorated tube and stand it up, it could then be used to hold your bracelets on the outside and pens on the inside!

Hope you enjoyed this quick and easy project, as you can guess I'll be back with another project tomorrow! Bye for now!

Tuesday, 10 June 2014

Hunny pot pendants

This tutorial will show you how to make a


This pendant has been made into a keyring and can be easily personalised, so instead of saying 'Hunny' it will say a name making it that much more special!

So heres what you will need:

- brown polymer clay
- yellow polymer clay
- black permanent marker
- 1 eyepin
- Connecter
- keyring or necklace/bracelet

Step 1: soften the brown and yellow clay then mix some yellow clay with the brown clay. ( if you want to be specific use the ratio 3 parts brown to 1 part yellow, 3:1 )


Step 2: you will then need to make a rounded square shape for the base of your hunny pot and of course a lid.

Step 3: roll out some of the yellow clay, then roll into a sausage.

Step 4: Bend the sausage 3 or 4 times then roll again, cut off the top to leave one straight edge and one wavy or curvy edge.

Step 5: Attach this beneath the base of your lid on your hunny pot.


Step 6: Attach an eye pin into the top, then bake!

Step 7: Carefully write on 'Hunny' or a name or message, then simply attach a connector and loop on the keychain, necklace or attach onto a bracelet as a charm!


Enjoy your new hunny pot pendant!

Don't forget to share and follow using the 'Join this site' button on the left hand side!


Sunday, 8 June 2014

Over 1000 page views + minnie mouse hair accessory!

Wow, it's finally the start of Disney week on my blog and I have finally reached 1000 page views, I think this is quite an achievement!

So here's how to make the minnie mouse inspired hair bow:

For this tutorial I used polymer clay but you could use patterned fabric and make the hair bow in a similar way.

So first of all you will need to soften a large piece of red clay and a smaller piece of white clay, I used around 2/3 of a 25g block of clay or 1/6 of a 50g block of clay.


1. Roll out the red clay into a thin stripe and a thin larger rectangle, if the clay is not soft enough it will be difficult to roll it without it breaking, so spend a good amount of time softening the clay.

2.Split the white clay into six small balls.

3. Lay out the white balls on the larger rolled out rectangle.

4. Flatten these out to make them level with the red clay.


5. Pinch the clay into the centre to form a bow.

6. Wrap the thin strip of red clay around the centre and slightly roll in your fingers to secure.

7. Bake, then leave to completely cool, next glue onto a hair slide, and wear your bow with pride!


Hope you enjoy this tutorial, my next post will be on tuseday and of course will be another  Disney themed project!!

Don't forget to share using the buttons below and comment below or on the comment page, you don't even have to have a google account to comment!


Monday, 2 June 2014

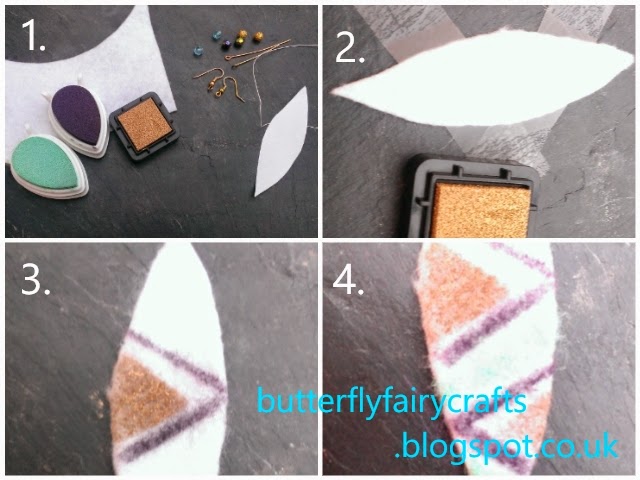
Tribal feather earrings


Today I have mixed jewellery skills with sewing and card-making skills to make these tribal feather earrings.

1. What will you need:                                                  Time taken:  15 minutes
- Two eye pins                      
- Two hook earrings
- White felt
- A range of inks
- Sellotape/ masking tape
- Scissors
- Some form of gloss


2. Using the downloadable template cut out two feathers from white felt. Then mark off a triangle using tape.

3. With your choice of ink, cover the marked out area, I recommend gold or silver for a more tribal appeal, next mark out two stripes on the outside and again cover in ink, I recommend a darker colour.

4. Repeat this the opposite way then colour the rest of the feather with a lighter colour to complete the tribal effect.


5. Cut small slits each side of the felt piece.

6. Add gloss to strengthen the feather and pierce a hold in the top of the feather using a needle, this is for the eye pin. Leave the gloss to dry.

7. Add the eye pin and the earring hook, and your done!

Enjoy your new tribal feather earrings! Feel free to leave comment below or on the comments page!


Wednesday, 28 May 2014

Fancy a change???

Have an old necklace that really needs an update?

Just change the pendant!


Step 1 - Use some jewellery pliers to take off the old pendant.

Step 2 - Slide on the new pendant and tighten again using pliers.

Finally enjoy your new necklace!!!


Join me tomorrow for more great tutorials or subscribe now to get exclusive tutorials and tutorials up to one week faster!

Sunday, 18 May 2014

Beautiful button bracelet

Go button crazy with these bracelets.

All you need is:

- some buttons
- some coated elastic


To make the pastel double button bracelet,


Loop the coated elastic and knot.

Then thread a larger button through one hole, then thread a smaller button through one hole.

Thread the thread through the other hole, then continue in this fashion until you have enough buttons threaded on as you desire.

To finish off tie a knot at the end.

To wear simply slide the last button through the loop to secure.

To make the blue beach bracelet,

Cut two pieces of coated elastic, equal in length.

Tie each end in a knot, then thread the elastic through one hole of the button and back out through the other, continue like this until you have as many beads as you desire.

Do the same to the other length of elastic but using different beads.

 Tie the two ends of elastic together, then bring the other ends up and tie them to create two bracelets that are joined at one point.

Next week, a tablet, phone, kindle or book rest!

Share the love with,